Well, its been YEARS since I’ve taken good old analog pictures, and i’ve had it on my wishlist to scan in all my old photos. There are various services out there that will scan in your photos for you, but i always like to see what’s possible to do yourself. I didn’t do a ton of research, but some basic checks seemed to be around $150 for a service to scan a box of photos the size i have (around a large shoebox). So I’ve been looking around to see if i can do it cheaper myself. Unfortunately there doesn’t seem to be a huge market for consumer priced photo scanners with auto feeders (too bad!). If you’re looking for a new all-in-one printer/scanner, you can find many from $100-200 that have automatic document feeders, but most these feeders are made for 8×11 paper, not photos. Given the price of toner/ink these days, i was at a decision point on my old printer. A few deals popped up, and i researched a few options, but couldn’t find anything that definitively said it could handle photos in the feeder.
From my research over the years, I’ve also had my eye on the old Epson Perfection 2480 scanner for a few years, which has long gone off the market, but seemed to be what i needed after you add the optional Multi Photo / Business Card Feeder. This is a pretty expensive bundle, all taken together, but i’ve been keeping an eye out and finally found it on ebay for around $85 total for both. That’s right in my range, so i pulled the trigger and here’s my review.
First, I unpacked it and it was actually much smaller than i expected. It looks sorta bulky on the Epson website, but in general was much slimmer. (Take a look at it next to my 10″ Hackintosh Netbook.)
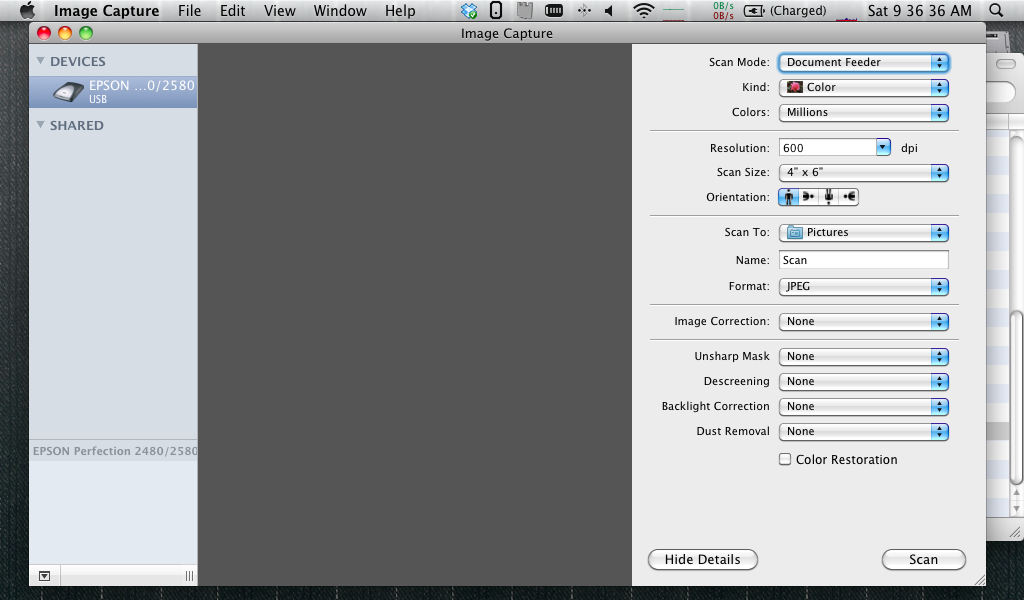
Next i went to hook it up to the Mac-n-book. I didn’t try out any of my existing apps to see if it would work out of the box, but headed over to Epson’s Support website to look for a driver, figuring it was too old to work on its own. Turns out they have 2 options, a plugin (latest 08/2010) for Apple’s native “Image Capture” ( ICA Scanner Driver v5.3.0 for Image Capture ) and their own Scan Utility & Twain Driver (for Photoshop/etc) from a very long ago 08/2006 ( TWAIN Driver and EPSON Scan Utility v2.77A ). I opted to try out the simple/newest path first, with Image Capture, assuming i wanted to avoid a presumably heavyweight Epson scanning program (especially since it was from 2006) and assumed Photoshop might not support the feeder. I installed the Image Capture plugin, and launched it, and it was super easy from there. The preview window gives you an option to switch to the feeder, select the destination, and just hit scan. And it worked like a charm.
The first thing you notice about this scanner is just how loud it is. Man, this thing is like a jet engine, with the only downside being that it won’t get you to London in 2 hours. When I bought it, I wasn’t expecting it to be quiet, but I think i got my hopes up when it turned out to be so small. I’m probably going to have to run this in another room in the background. Good thing it is automatic! For 24 pictures at a time, that is. But that’s not too bad. (Since then, I’ve taken to running it under the cardboard box it shipped in to quiet some noise.)
Now onto that jet-powered speed. My first attempt without tweaking any settings took 1:25 to scan in 4 sample photos at 4″x6″. Not too bad. I checked out the ouput (in my Pictures folder), and was surprised to see a single PDF file instead of individual JPEG’s or TIFF’s. That’s interesting for scanning multi-page documents, but definitely not how you want your photo’s stored. So I headed back into the software, and found the “Show Options” button to toggle advanced options. Here you get many more options, including file format, resolution, size/rotation, and a few basic image correction options. I was surprised that it was already set to TIFF, yet producing PDF’s. So i switched it to JPEG, assuming that for me I don’t mind some compression (versus uncompressed TIFF) given these are all super old photos and i’m not going to get spectacular images anyway over. Also, I think it was on 300 DPI, but its hard to tell given I’m not sure I trusted it was actually on TIFF previously.
So I set it to 300 DPI, JPEG, no rotation or correction, and hit scan. This time it took 1:45 to scan the same 4 photos. This produced files at 1200 × 1800 around 500 KB each, which was basically full screen on my 1900×1200 screen 24″ monitor, and a bit bigger than my 1080p TV. And they looked pretty good for old photos. I then tried 600 DPI, 1200 DPI, and 2400 DPI, at which point the scanner obviously slowed to a dead crawl and i called it quits, although the settings went up to 6400 DPI (despite the Epson website says 2400 x 4800 DPI). Here’s the summary running the same 4 photos through each setting:
300 DPI – 1:45, 1800 x 1200, 500 KB each
600 DPI – 2:20, 3600 x 2400, 1.7 MB each
1200 DPI – 5:10, 7200 x 4800, 5.9 MB each
2400 DPI – 19:12, 14400 x 9600, 17 MB each
So pretty much, 600 DPI is probably my sweet spot given the time isn’t much different, and that’s about the max file size i want, given my 12 Megapixel digital camera produces 2-3MB files. I don’t think i’m printing/blowing up any of these scans (since I’ve never done so with any of my digital pics), so for on screen this is about right. Since I’m out of ink (which promoted me to make a decision on this versus a new all-in-one), I’ll have to try a test print at work to see just for fun.
So now onto the bulk of the scanning. My first stack of 20 took 11:10 @ 600 DPI. The next stack was 26 photos, so time to test the 24 photo limit. This worked fine, at 14:45, even taking the extra few photos.
This thing also has a slide/negative scanner with the original scanner, so i may have some old negatives lying around to try too, but that’s not a giant concern of mine, and it isn’t automated either.
So overall, this thing seems to be good for me. I spent a few hours and got through a few stacks. I’m still not done yet, and eventually got bored when I originally started writing this article, but now i’m back writing some other articles, and I’ll let it go in the background for another few hours. Overall, was this worth the $85 versus shipping them out to be scanned? Probably not, as I did get bored quickly and the extra work might not be worth it. But I realized that after taking all the photos out of their envelopes, that I had much less than i thought, and might have been able to find an even cheaper price to send them out. And of course I was betting on getting my money back so when I’m done, maybe look for mine out on ebay. So, it was a good project, a good learning experience, and I’m sure to make millions off this article too. So all-in-all, not bad.
Gallery: